

 Restoring a classic Mustang from the first generation (1965 - 1973) is both a rewarding journey and a technical challenge. These cars - ranging from early 1965 models to the muscular 1973 fastbacks - are classics of American automotive history. However, many restorers fall into common traps that undermine both the integrity and value of the final build.
Whether you're tackling a numbers-matching 1966 GT coupe or a 1970 Boss 302, here's a thorough guide to the 10 most common and costly restoration mistakes, complete with historical context and technical insight.
1. Failing to Address Structural Rust in Critical Areas

Where it happens:
- Torque boxes (especially on convertibles)
- Front frame rails and shock towers
- Floor pans, inner rockers, cowl panels, and rear trunk drop-offs

Above: Rusted out driver's side torque box in a 1st generation Mustang convertible (photo courtesy of StangNet.com - an online Ford Mustang forum)
Why it's a mistake:
These Mustangs were unibody cars made of stamped steel with minimal rustproofing. Especially in rust-prone climates, critical structural areas may look solid but be internally corroded. For example, torque boxes - which brace the front frame rails to the floor pan - often rust from the inside out, threatening structural integrity. Cowl vents are notorious water traps; failing to repair or replace them can allow water to leak onto your restored carpet within weeks.
What to do instead:

- Always perform a complete sandblast or media blast.
- Probe torque boxes and cowl panels with inspection cameras.
- Replace rusted panels with proper patch panels from reputable suppliers like OER, not just fiberglass repairs or undercoating cover-ups.
2. Neglecting One-Year-Only or Rare Option Variants
Examples:
- 1964½ (known as early 1965) models had generators, not alternators, and different wiring harnesses.
- 1967 introduced dual-reservoir master cylinders and collapsible steering columns.
- 1968 added side marker lights and changed seat belt anchoring systems.
- 1969–70 Boss 302s used unique oil cooler brackets and shock tower bracing.
- 1971–73 Mustangs had longer, wider bodies (photo below) and entirely different front suspensions.

Above: 1971 Ford Mustang Boss 351 with 351 CID Cleveland V8 engine (code R)
Why it's a mistake:
Mustang design evolved rapidly year over year. One-year-only parts (e.g., 1965 GT fog light switch, 1968 emission controls, or 1970 deluxe seatbelt retractors) are often replaced with incorrect versions, killing authenticity and reducing resale value. Collectors look for period-correct restoration down to component casting numbers and wiring colors.
What to do instead:
- Cross-reference the car’s build date (via door tag) and VIN against factory service manuals.
- Use Mustang-specific catalogs (Classic Industries digital or printed) to identify correct year-part applications.
- Join Mustang forums and research Marti Reports for accurate option decoding.
3. Using Low-Quality Reproduction or Ill-Fitting Parts
Common offenders:
- Front grilles that don’t fit radiator support brackets
- Door weatherstripping that prevents door closure
- Poorly chromed bumpers or trim pieces
- Interior door panels with incorrect stitching patterns
Why it's a mistake:
Poor-fitting parts are not only frustrating but also degrade the visual and functional quality of a restoration. Some aftermarket suppliers cut corners on tooling or materials, especially for high-demand parts like grilles, bezels, and emblems.

Above: OER Authorized 1967 Mustang Fastback driver's side (LH) quarter panel (p/n 27840VR)
What to do instead:
- Buy from suppliers who specialize in accurate Ford reproductions, like Original Equipment Reproduction (OER).
- Look for OEM-style tooling and part numbers when available.
- Whenever possible, restore original components - such as rechroming original bumpers or re-skinning (1967 linked) original seats.
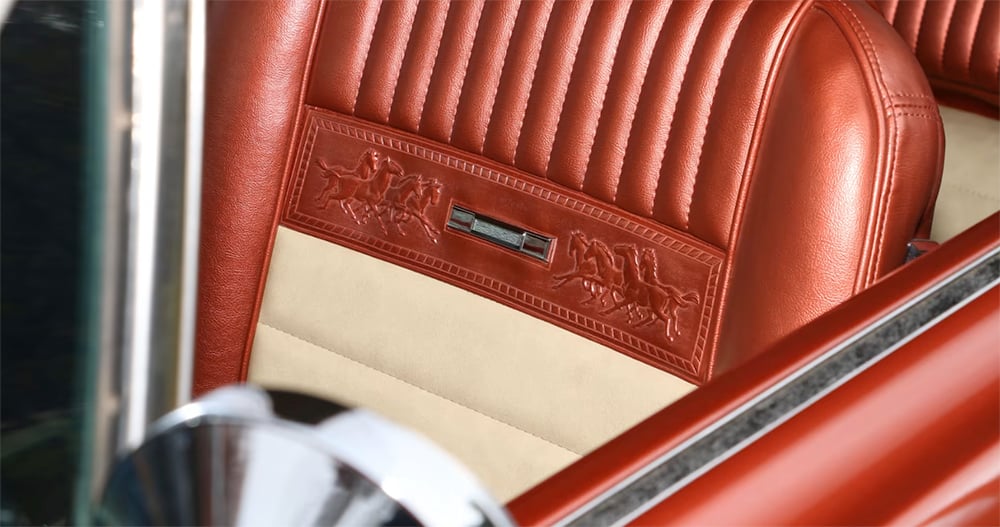
Above: Proper 1966 deluxe Mustang pony interior seat covers in Emberglo and white
4. Incorrectly Reassembling Body Panels Before Paint
Why it’s a mistake:
Painting body panels while they’re mounted leads to poor alignment and paint chipping during reassembly. On a unibody car like the Mustang, precise body gaps (especially between hood/fenders and trunk/quarters) are critical to achieving a factory appearance.
Common mistakes:
- Painting fenders on the car without test-fitting the hood
- Bolting up doors without pre-aligning hinges and striker plates
- Not test-fitting trim pieces before final paint
- Conduct a dry-fit or "mock-up" of all exterior panels before painting.
- Paint panels off the car when possible, then carefully reassemble.
- Align body lines using shims and proper torque sequences for door and hood hinges.
5. Ignoring Drivetrain Authenticity and VIN Matching

Critical identifiers:
- Engine block date codes (cast on the rear driver side of the block)
- Transmission tag ID (small metal tag bolted to automatic or manual case)
- Rear axle tag and casting code
- Body buck tag and door data plate
Why it’s a mistake:
Many restoration buyers - and concours judges - look for "matching numbers" to verify authenticity. Installing a non-original engine, even if it’s a period-correct 289 or 351, will significantly reduce the car’s value if it can’t be traced to the original build.
What to do instead:
- Use resources like Marti Auto Works reports, factory assembly guides, and VIN decoders.
- If the original engine is gone, look for date-code correct components from donor vehicles.
- Stamp replacement blocks only if legally appropriate and always disclose during resale.
Decoding a 1969 Mustang VIN - Example Below:
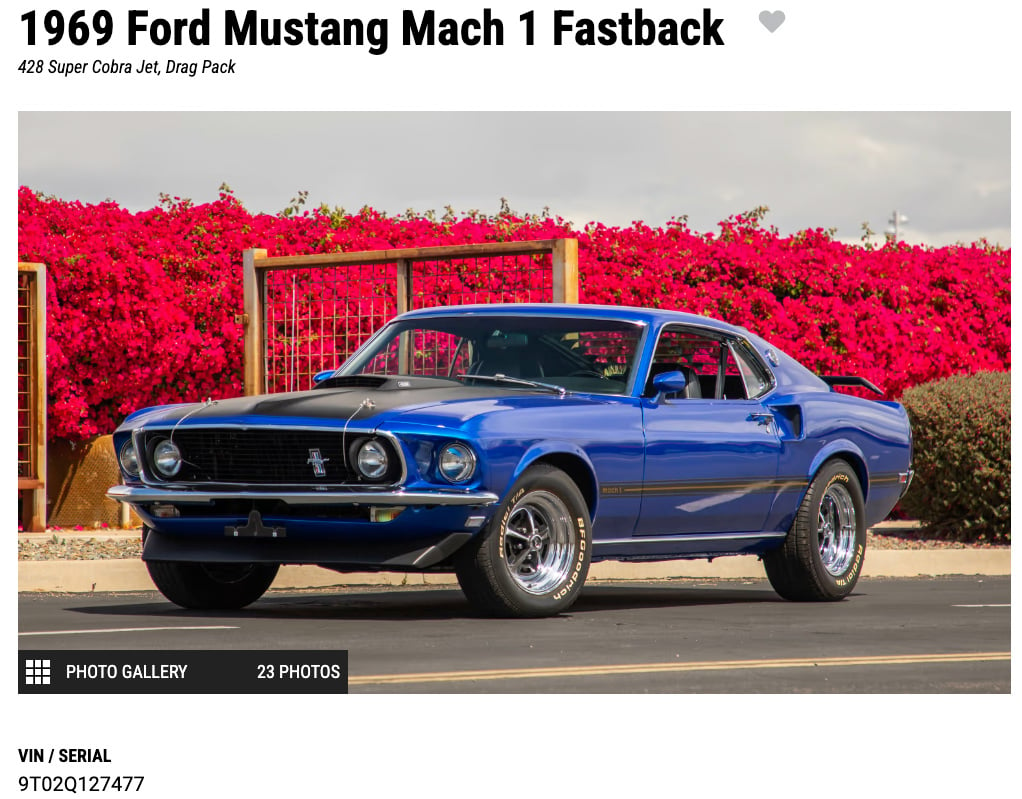 Above: This 1969 (code 9 for year 9) Mustang Mach 1 was built in Metuchen, NJ (code T). The sapphire blue pony car sports a Q code engine, which means there's a 428-cubic inch Super Cobra Jet with Drag Pack, 335-horsepower V8. Giddy up! The 02 code means that it's a fastback, which is also known as a sports roof model.
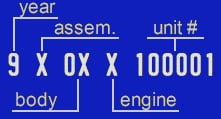
Year: 9 = 1969
Assembler:
F = Dearborn Michigan
R = San Jose, California
T = Metuchen, New Jersey
Body:
01 = Hardtop
01 = Hardtop Grande
02 = Fastback
02 = Fastback Mach 1
02 = Fastback Boss 302, Boss 429
03 = Convertible
Engine:
T = Standard 115hp 200ci 6-Cyl
L = Optional 155hp 250ci 6-Cyl
F = Optional 210hp 302ci 2V V8
H = Optional 250hp 351ci 2V V8
M = Optional 290hp 351ci 4V V8
G = Optional Boss 302 (290hp 302ci) 4V V8
S = Optional 320hp 390ci V8
Q = Optional Cobra Jet 335hp 428ci V8
R = Optional Cobra Jet RA 335hp 428ci V8
Z = Optional Boss 429 (375hp, 429ci) V8
Unit Number: 1969 Mustangs start at 100001
For 1969, the VIN number was moved again to the top edge of the dash on the driver's side visible through the windshield. It remains in this location to current day Mustangs.
6. Over-Restoring with Modern Components (Unless You Intend a Restomod)

Above: Highly modified interior for a super nice 1969 Mustang restomod pro-touring canyon carver convertible - Be sure to plan what you want to build before you begin your restoration or restomod or pro-touring or vintage racing build, if you're going from the ground up.
Examples:
- Installing LS-style serpentine systems in a small-block Ford engine bay
- Using billet aluminum dashboards
- Replacing factory drum brakes with oversized Wilwood racing kits without hiding the change
- Adding touchscreen infotainment systems in full view
Why it's a mistake:
While modern upgrades improve drivability, they detract from the originality unless your goal is to build a restomod. For concours restorations, these modifications are points deductions—or outright disqualifications. Of course, that doesn't mean that a pro-touring restomod won't be worth a ton of money when it's finished. You simply need to have a thorough plan of what you wish to create.

Above and two below: A superb 1969 Ford Mustang Mach 1 fastback restomod with a Ford Coyote V8 and a Tremec six-speed manual transmission vs. a 1969 Mustang Boss 429 that's restored to factory fresh vs. a 1970 Boss 302 Mustang vintage race car (#41 photo by the author at Laguna Seca) that's vintage raced at tracks like WeatherTech Raceway Laguna Seca, CA, Willow Springs, CA, Mid-Ohio, Watkins Glen, NY, etc. Build what you want, if you're going from the ground up, but plan it out.


What to do instead:
- Decide early: Concours, OEM+, or Restomod?
- Use hidden upgrades when needed: e.g., dual-reservoir master cylinders painted black, or Retrosound radios with factory-style knobs.
7. Mismatched Interior Components for Year/Trim

Above: Early 1965 Mustang dashboard in a K-code, non-GT notchback coupe showing horizontal analog speedometer (both horizontal and round - lots to choose from)
Interior evolutions:
- 1965 non-GT Mustangs had a wide horizontal layout speedometer; 1966+ moved to a round speedometer.
- 1966 "Pony" interior featured embossed ponies on seat backs.
- 1969 introduced high-back bucket seats with integral headrests.
- 1971–73 had a dramatically different dashboard and door panel shape.
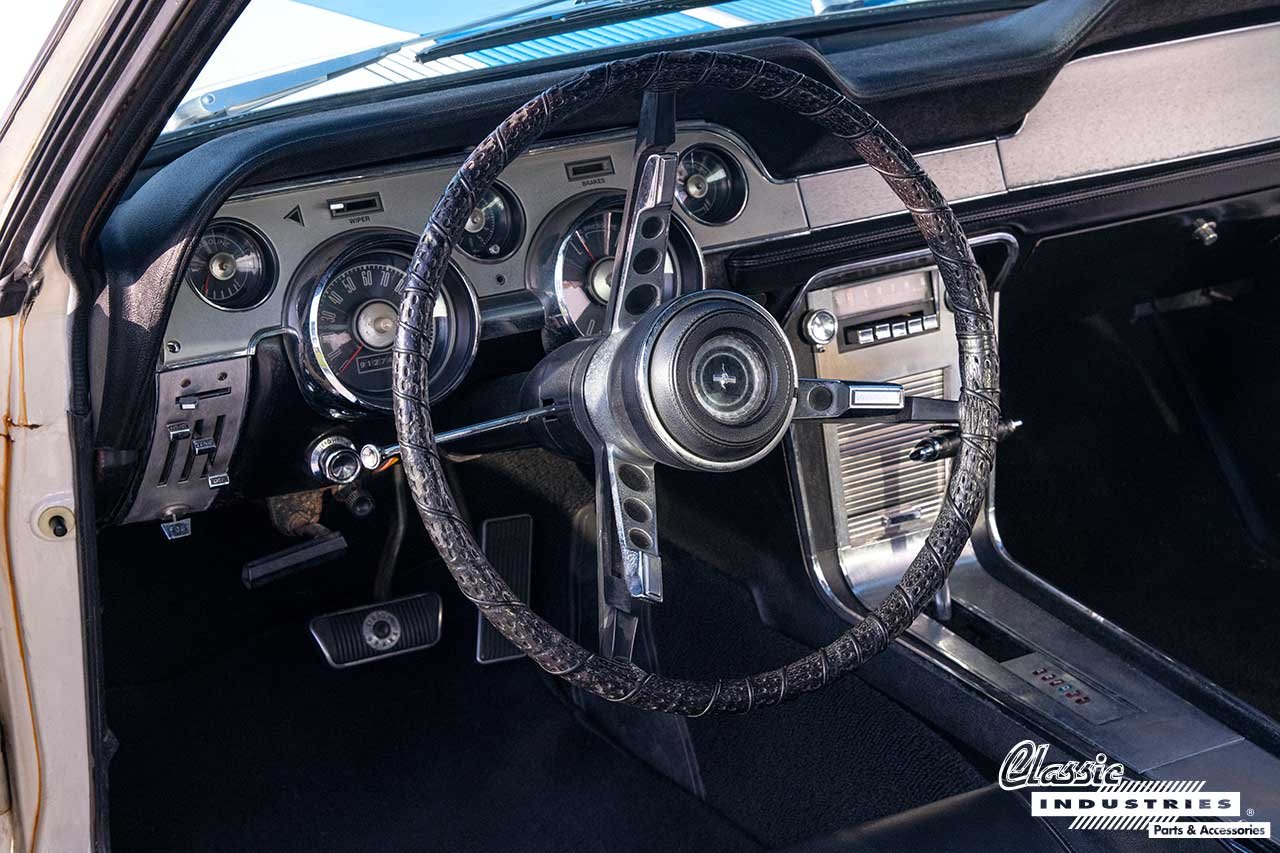
Above: 1967 Mustang dashboard showing round speedometer and 1967 Mustang steering wheel
Why it’s a mistake:
Installing a 1970 dash bezel in a 1969 car or using later-model high-back seats in a 1965 coupe, disrupts the factory look and breaks restoration accuracy.
What to do instead:
- Refer to Ford’s interior color and trim charts.
- Match seat foam, carpet pile, and gauge cluster layout to the build year.
- Avoid universal parts that don’t conform to the factory design.
8. Improper Brake or Suspension Restorations

Above: Here's an example of a very well restored 1970 Boss 429 Mustang chassis, so correct that the Ford assembly line inspection markings are present on different parts of the chassis and drivetrain.
Common issues:
- Reinstalling single-reservoir master cylinders on post-1967 cars
- Using incorrect front coil spring rates or mounting geometry
- Skipping rear leaf spring bushing replacement
Why it’s a mistake:
The suspension and brake systems are vital to safety. Many Mustangs had weak drum brakes (especially the inline-six models) and vague manual steering. Suspension geometry changed in 1967, then again in 1971 with wider track widths. Mixing components causes poor ride quality, uneven tire wear, and potential brake failure.
What to do instead:
- Upgrade to dual-reservoir master cylinders for safety (67+ style).
- Use suspension parts that match the correct spring rate and ride height.
- Replace all bushings, tie rods, and ball joints during restoration.
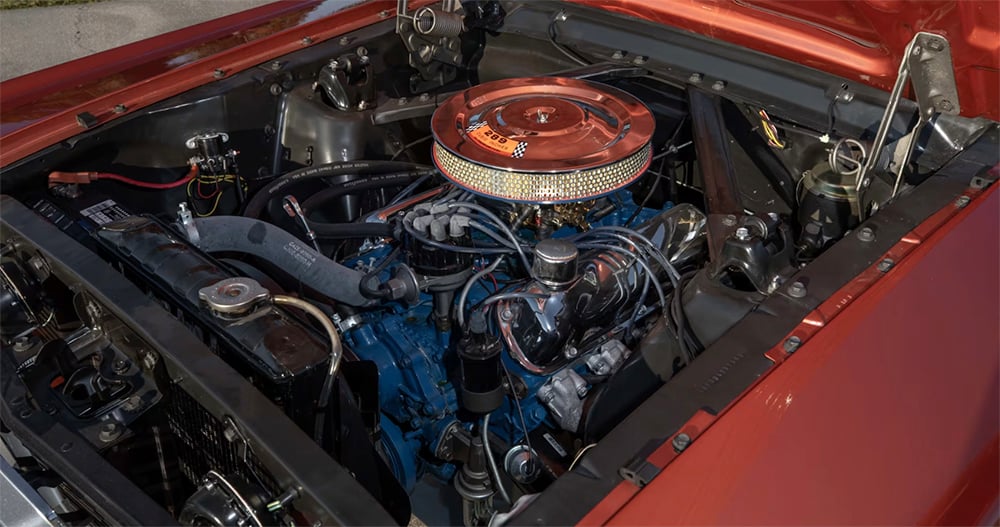
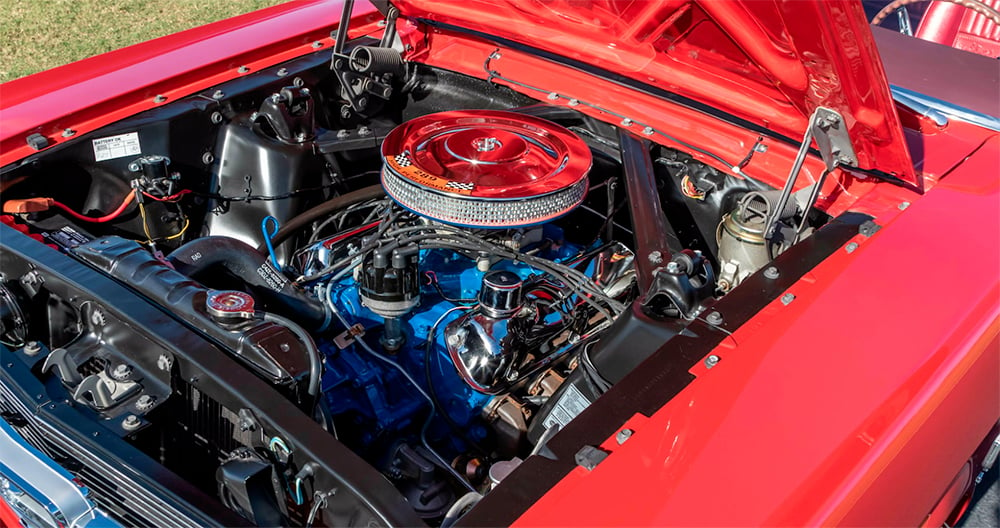
Above and two below: K code engines are easy to identify. The K code engine will not have a vacuum advance on the front of the distributor. K codes all utilized solid lifters. All K code engines accordingly had mechanical advance distributors with dual points. The distributor housing was smooth and had no provision for a vacuum advance. Hence, the engine above is an A code, 225-horsepower, 4V, 289 Ford small block V8. While the two engine pictures below show the high-performance K code 289 Ford V8 with the solid-lifter 271-horsepower engine (no vacuum advance on the front of the distributor).

Factory configurations:
- 1965–66 289 2V and 4V with Autolite 2100/4100 carbs
- 1969–70 Boss 302 with Holley 780cfm four-barrel carburetor
- 1971–73 351C with 2V or 4V heads required different manifolds and carbs
Why it’s a mistake:
Incorrect carburetor size or fuel system setup results in drivability problems and inaccurate representation of engine performance. For example, running a 2-barrel carb on a 4V intake will cause fuel distribution issues and performance loss.
What to do instead:
- Identify the correct carburetor and intake per engine code.
- If upgrading, use period-looking Holley or Edelbrock options and hide modern fuel pressure regulators.
- Rebuild the original carburetor if it’s salvageable.

Above: Example of documenting and decoding a 1965 Mustang, replete with a Marti Report on the fastback (center top document)
Why it's a mistake:
Restoration is an investment. Without documentation of the process - including VIN tags, part numbers, receipts, and before/after photos - resale value diminishes, and buyer confidence drops. It also makes it harder to retrace your steps if something was misaligned or painted incorrectly.
What to do instead:
- Photograph every step - from disassembly to media blasting, and every torque spec.
- Create a build book or digital file with receipts, parts suppliers, and restoration notes.
- Include Marti Reports, appraisal letters, and drivetrain decoding guides.
Final Thoughts

Above: The undercarriage of a restored-to-the-nine's,1969 Boss 429 Mustang - the nose of the same Boss 429 is just below.
Restoring a 1965–1973 Mustang to its original glory requires research, precision, and historical respect. Every detail - be it a shock tower brace, carburetor linkage, or AM radio knob - tells the story of that era in American muscle car history. Avoiding these ten major mistakes will not only ensure a better restoration but also preserve the spirit and value of one of the most epic American pony/muscle cars ever made.
Classic Industries-Your Source for Ford Mustang Parts

Given Classic Industries' solid reputation for providing American pony and muscle car parts the world over, millions of American muscle car enthusiasts know that CI's an awesome resource for Mustang components. Mustang owners can initiate searching for Ford Mustang parts online. Online parts purchases can also be supplemented by also obtaining the Classic Industries' Mustang Parts & Accessories Catalog. Classic Industries also now has an all-new and all most excellent digital Mustang catalog. The button's just below the printed catalog click through. Happy hunting, shopping, building, driving, and enjoying your Ford Mustang and/or Shelby Mustang!


Classic Industries' Ford Mustang History Articles
We have a growing library of Ford Mustang and Shelby Mustang history articles available for your entertainment, education, and inspiration. Have fun in the CI library:
- Ford Mustang History: Creating the First Pony Car
- 4th Gen SN95 Mustang History: Development & "Fox 4" Concept Cars
- Fox Body Mustang: Development, Concepts, and 1979-1993 Year Changes
- 1964-1973 Ford Mustang VIN Decoder & Pre-Purchase Buyer's Guide
- 1964.5 (Early 1965) Mustang VIN & Data Plate Decoder
- The Wild Horse Galloped Away - 1969 Shelby GT350 Mustang Fastback
- Visiting the Segerstrom Shelby Event Center - Mr. Shelby is Smiling!
- Building & Driving a Factory Five Racing Mk4 1965 427SC Cobra Replica
- Decoding Your 1965 Ford Mustang's Data Plate & VIN
- 1965-1970 Shelby Mustang Paint Colors, Fun Facts, & Specifications
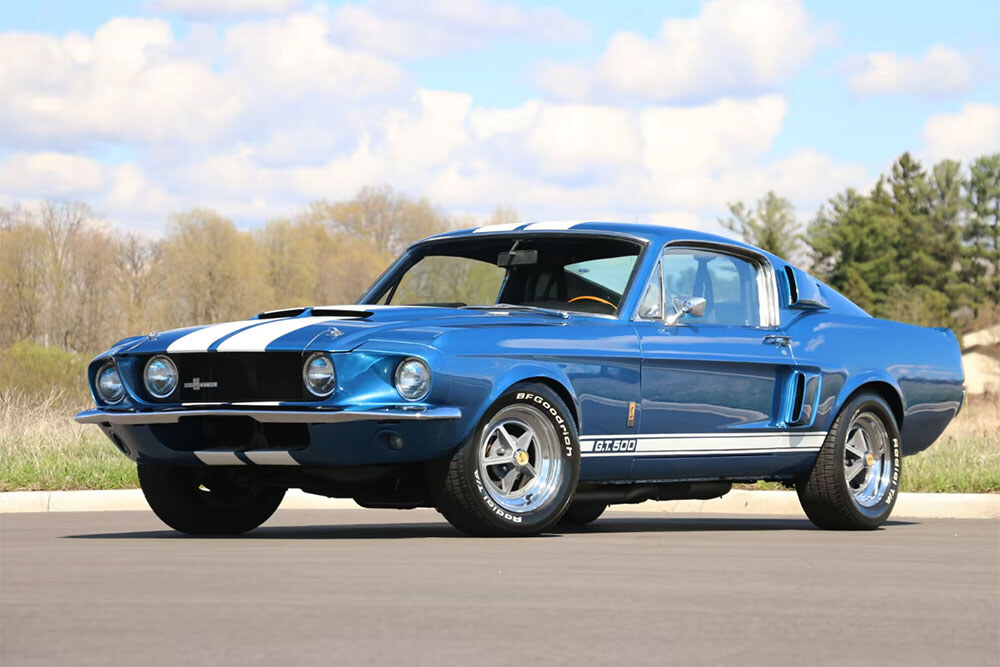
Above: 1967 Shelby Mustang GT500 fastback - Many of the photos used in this article are courtesy of Mecum Auctions, like the one just above.
