


Especially the second-generation Dodge Charger is one of the crown jewels of the Mopar world, with the ’68–’70 models commanding center stage at every car show and auction block. Whether you’re working on an early ’66–’67 “Coke bottle” fastback, a winged Daytona, or a smog-era ’74 R/T, restoration blunders can tank both the car’s value and its drivability. Below are the ten most common mistakes restorers make when reviving a classic Charger.
1. Ignoring Original Build Specs

Above: 1966 Dodge Charger - The lead photo is of a 1968 Dodge Charger with a 426 cubic inch Hemi V8 that's backed by a four-speed manual transmission (photo courtesy of Mecum Auctions).
The Mistake: Slapping together a car without referencing the fender tag, broadcast sheet, or VIN.
Why It Matters: Dodge was notorious for small production quirks. A Charger built in Hamtramck might have different trim and fasteners than one built at St. Louis. Incorrect badges, wrong grille inserts, or missing vinyl top moldings instantly tip off purists.
Pro Tip: Decode your fender tag, confirm drivetrain codes, and document every factory option before ordering a single part.
2. Cutting Corners on Rust Repair
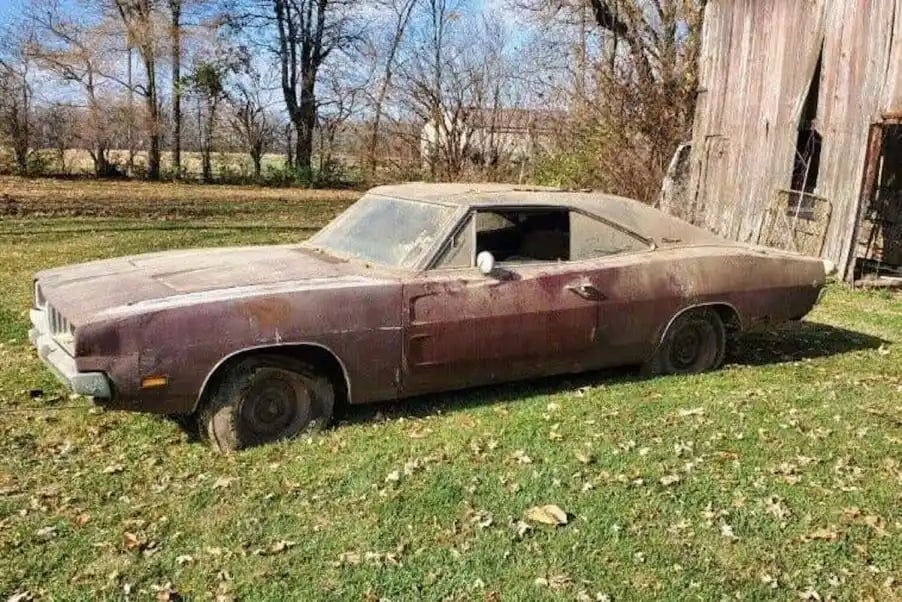
Above: A rather rusty and crusty 1968 Dodge Charger that's still worth salvaging, so long as you have a company like Classic Industries to obtain those hard to find, must have reproduction parts, performance items, and accessories.
The Mistake: Using patch panels or bondo over rust in quarters, trunk pans, or torsion bar crossmembers.
Why It Matters: These cars are unibody, so structural integrity is everything. A rusty K-member mount or rear frame rail makes the Charger a death trap. Worse, sloppy panel work kills resale value.
Pro Tip: Invest in proper AMD or OER Authorized panels, and weld, don’t rivet. Mopar judges can spot a skim coat of filler from across the lot.

Above: Proper 1968 Dodge Charger OER Authorized LH quarter panel - part # MM1321
3. Getting the Drivetrain Wrong
The Mistake: Dropping in a “close enough” 440 or small block without regard for what the car originally carried.
Why It Matters: A Charger R/T that left the factory with a 426 HEMI or a 440 Magnum loses serious value if you stuff in a generic RB block with the wrong heads, intake, or carb. Even mismatched date codes can ding six figures off auction bids.
Pro Tip: Date-code your block, heads, and transmission. At minimum, stick with a correct-era motor family.

Above and below: Cutaway drawing of a 426 cubic inch Hemi V8 mill and an actual 426 Hemi engine in a 1968 Dodge Charger RT

4. Botching the Interior
The Mistake: Cheap seat covers, incorrect dash bezels, or dyeing vinyl instead of sourcing correct-grade materials.
Why It Matters: Mopar interiors were highly distinctive - think woodgrain Rallye dashes, Charger script on door panels, and high-back buckets. Wrong textures or mismatched colors scream “amateur job.”
Pro Tip: Legendary Auto Interiors and Parts Unlimited Interiors reproduce factory-correct patterns. Don’t cut corners - this is where judges and buyers spend the most time.

Above: 1968 Dodge Charger R/T interior - below are Parts Unlimited Interiors' 1968 Dodge Charger bucket seat upholstery in Cologne Grain Vinyl w/ Bambino Grain Vinyl Inserts - Light Metallic Blue/Navy - part # PB81111357.

5. Chrome and Trim Shortcuts
The Mistake: Painting over pitted pot metal, polishing aluminum incorrectly, or mixing aftermarket trim with OEM.
Why It Matters: Chargers are trim-heavy cars: the hidden headlight grille, “flying buttress” rear window moldings, and tail panel brightwork are iconic. Wrong finish on anodized aluminum is like chrome spray paint on a Rolex.
Pro Tip: Re-chrome original parts or hunt down NOS when possible. Avoid reproduction pieces with poor fitment unless you have no choice.
Video: How to Tell the 1968-1970 Dodge Chargers Apart
6. Over-Restoring (a.k.a. “Better Than New”)

Above and below: Nut and bolt restoration of a 1969 Dodge Hemi Charger 500 - This 1969 Dodge Hemi Charger 500 looks to be done the right way, but a closer in person inspection might yield an overdone restoration conclusion. Oftentimes pictures don't tell the whole tale; you'll need to inspect the Charger with your own two eyes to get the whole story.
The Mistake: Shiny powder-coated suspension parts, stainless fuel lines, or modern clearcoats with mirror gloss.
Why It Matters: Factory Chargers weren’t perfect - overspray, orange peel, and dull undercarriage finishes were the norm. Judges dock points for show-car gloss under the floorpans. Collectors see it as inauthentic.
Pro Tip: Study survivor cars. Chrysler used dip primer and body-color overspray inconsistently. Mimic those flaws for authenticity.


Above and below: 1969 Dodge Daytona Charger - Is this beauty over-restored? Possibly. An in person inspection would yield the truth, and perhaps you'd want to have a Mopar expert assist with the investigation, if you're looking to buy a finished 1969 Dodge Daytona Charger. This one crossed the Mecum Auctions' 2022 Kissimmee, Florida auction block and sold for $308,000!

7. Skipping Electrical Details
The Mistake: Universal wiring harnesses or cheap spade connectors instead of Mopar-specific setups.
Why It Matters: Chargers are notorious for bulkhead connector meltdowns, ammeter gauge failures, and grounding issues. Incorrect wiring is a fire waiting to happen.
Pro Tip: Use reproduction M&H harnesses and rebuild bulkhead connectors. Ground everything properly and retain factory routing.

Above: 1968 Dodge Charger Wiring Diagram Manual - part # L1226
8. Wrong Wheels and Tires
The Mistake: Bolting on Cragar S/S or oversized 17-inch alloys “just because they look cool.”
Why It Matters: Chargers had distinct wheel options - Magnum 500s, Rallye wheels, or steelies with dog-dish caps. Oversized rubber kills stance and steering geometry. Judges and Mopar diehards cringe at it.
Pro Tip: Match wheel choice to factory trim package. Use reproduction Polyglas tires or bias-ply lookalikes for period-correct stance.

Above and below: These 18-inch custom American Racing wheels and Wilwood six-piston caliper disc brakes are installed on a way cool 1968 Dodge Charger restomod that sports Dodge Viper V10 power. For the humble scribe's next Dodge Charger article, restoring vs. restomodding/customizing will be detailed. Stay tuned Dodge Charger Mopar Moguls, same Classic Industries' time, same Classic Industries' channel!

9. Overlooking Smog-Era Details
The Mistake: On ’73–’74 Chargers, deleting EGR systems, charcoal canisters, or Lean Burn setups during restoration.
Why It Matters: While many enthusiasts hate smog equipment, originality counts more than personal taste. Auction buyers want untouched emissions equipment, even if they never intend to drive it.
Pro Tip: Restore the smog hardware even if it’s not functional—you’ll protect resale value and authenticity.

Above and below: That round object in the passenger side front corner of the engine bay of a 340 cubic inch V8, four-speed backed 1973 Dodge Charger R/T is a smog abatement device - charcoal canister.

10. Skipping Documentation and Provenance
The Mistake: Restoring the car beautifully but failing to track ownership history, factory paperwork, or photos of the restoration process.
Why It Matters: Buyers don’t just buy cars; they buy stories. A “matching numbers” Charger without proof is just a nicely built clone.
Pro Tip: Photograph every stage of the restoration, keep receipts, and organize paperwork in a binder. Original broadcast sheets, window stickers, and warranty cards are gold.
Video: 1969 Dodge Charger R/T Broadcast Sheet Tutorial & Review
Final Thoughts
Restoring a 1966–1974 Dodge Charger isn’t just about sheetmetal and horsepower—it’s about honoring Mopar heritage. Avoiding these ten mistakes will not only safeguard your investment but also earn you respect in the muscle car community. Remember: authenticity trumps shortcuts every time, and a correctly restored Charger will always trump a thrown together hack job without the time, attention to detail, and craftsmanship that these mighty Mopar muscle machines deserve.
Classic Industries & Mopar Reproduction Components

Above: 1971 E-body Hemi Plymouth 'Cuda coupe
In case you're new to the Mopar muscle car hobby, you may not be aware that Classic Industries is a major provider of Mopar Chrysler, Dodge, and Plymouth restoration, performance parts, and accessories for 1960-76 Mopars, in addition to also providing components for Dodge trucks. Mopar enthusiasts are able to shop for components on the Classic Industries' website by Mopar vehicle. Dodge, Plymouth, and Chrysler owners can also request that an enormous Mopar Parts and Accessories catalog be mailed to your door. Whether you enjoy shopping for parts, wrenching on your muscle machine, showing, or going fast in your Mopar, Classic Industries can supply the parts that you need to keep your pride and joy running strong and looking great.


Above: The same 1971 E-body Hemi 'Cuda (most photos courtesy of Mecum Auctions)
